- Connect to VNC session Universal (Recommended)
- Connect to VNC session using Linux
- Connect to VNC session using OSX
- Connect to VNC session using Windows
This assumes you have a connection file generated on the OSC cluster that looks like:
$ cat /nfs/17/username/path/to/project/files/3456195.oak-batch.osc.edu.conn

Host: n0666.ten.osc.edu
Port: 5901
Pass: 3juRnrx0Mt
Display: 1

username:3juRnrx0Mt:n0666.ten.osc.edu:5901
Although you can improvise if you already know the connection details.
Connect to VNC session Universal (Recommended)
- Open the following URL in another tab (note: tested in Chrome & Firefox, not sure about IE or Safari)
https://ondemand.osc.edu/assets/hennypenny.html
- Copy the last line taken from the connection file, e.g.,
username:3juRnrx0Mt:n0666.ten.osc.edu:5901and paste it into the box located in the above URL.
-
Click "Generate JNLP" and download the JNLP file.
-
Open the downloaded JNLP file with Java and click "Connect". All of the options for the TightVNC connection should be already properly filled out.
-
Type in your AweSim account password when prompted.
-
Following that, type in the VNC password provided in the connection file.
Multiple Sessions: In order to open multiple VNC sessions simultaneously just generate multiple JNLP's from each connection file and open each of the JNLP files.
Connect to VNC session using Linux
- From the command line on your local machine:
$ ssh -L 5901:n0666.ten.osc.edu:5901 awe0001@oakley.osc.eduthis sets up an SSH tunnel between localhost:5901 => n0666.ten.osc.edu:5901
- Now connect using your favorite VNC client to
localhost:5901and the password provided in the connection file.
Multiple Sessions: In order to open multiple VNC sessions simultaneously choose a unique local port in step #1
$ ssh -L <unique port>:n0666.ten.osc.edu:5901 awe0001@oakley.osc.edufollowed by using localhost:<unique port> in step #2. This should be done for each unique simultaneous VNC session.
Connect to VNC session using Mac OSX
- Download and install the latest Chicken installer from
http://sourceforge.net/projects/chicken/files/
as of now it is currently Chicken-2.2b2.dmg
- Launch Chicken and in the connection window:
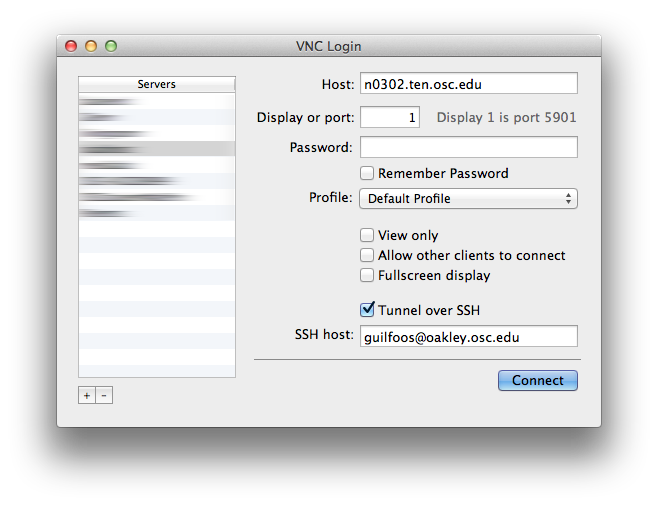
Fill in:
- Host (taken from connection file)
- Display (taken from connection file)
- check mark SSH tunnel
-
SSH host:
awe0001@oakley.osc.edu(substitute in your AweSim account)
Click Connect
- You will be prompted for your password. This information is again provided in the connection file.
Multiple Sessions: Just start up a new Chicken connection for each connection file.
Connect to VNC session using Windows
- Download and install Putty from
http://the.earth.li/~sgtatham/putty/latest/x86/putty-0.63-installer.exe
-
Launch putty
-
Set Host Name to
oakley.osc.edu -
In Connection->SSH->Tunnels:
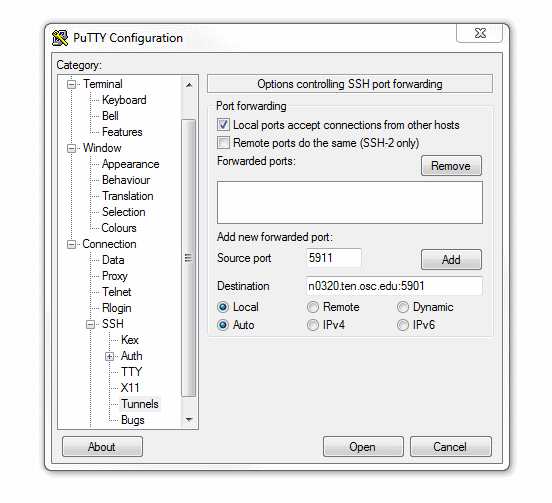
Fill in:
- Source port: 5911
- Destination: (taken from the connection file as Host: and Port:)
- Click the Add button when done
-
Click Open to connect to
oakley.osc.eduallowing SSH tunneling to your VNC server -
Now start a VNC client (e.g., TurboVNC) and connect to
localhost:5911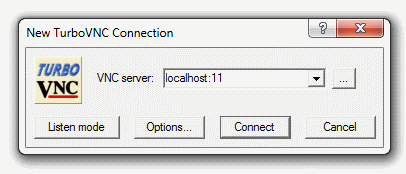
Multiple Sessions: Fill in a unique Source port in step #5 (i.e., 5912). In the VNC client of step #7 use this unique source port (i.e., localhost:5912). This should be done for each unique VNC session.